
Are you ready to take a trip down memory lane with a delightful twist? Today, we’re making homemade Eskimo Pie popsicles, a classic treat that brings back sweet childhood memories. Forget the store-bought versions; we’ll show you how to create these creamy, chocolate-covered delights right in your kitchen, using simple ingredients and a whole lot of love.
This recipe is not only fun to make but also incredibly rewarding, delivering a taste that’s far superior to anything you can buy.
Table of Contents
Ingredients for the Perfect Eskimo Pie Popsicles
Before we start, let’s gather the essentials for our homemade Eskimo Pie popsicles. These ingredients are key to achieving that perfect balance of creamy ice cream and crisp chocolate coating. For a truly decadent experience, understanding the role of each ingredient is essential.
For the Ice Cream Filling:
- 1 can (14 ounces) Sweetened Condensed Milk: This is the backbone of our creamy filling, providing sweetness and a rich texture. It’s crucial for achieving that dense, smooth ice cream consistency without churning. It also adds a unique flavor that complements the **homemade Eskimo Pie popsicles** perfectly.
- 2 cups Heavy Cream: The high-fat content of heavy cream is essential for creating a luxurious, melt-in-your-mouth ice cream. Don’t substitute with milk or half-and-half; the richness is key. This ensures that your **homemade Eskimo Pie popsicles** have that classic, creamy texture.
- 1 teaspoon Vanilla Extract: A touch of vanilla enhances the overall flavor, adding warmth and depth. Opt for pure vanilla extract for the best results. This subtle note elevates the flavor profile of the **homemade Eskimo Pie popsicles**.
- Pinch of Salt: This little addition enhances the flavors of all the other ingredients.
For the Chocolate Coating:
- 12 ounces Semi-Sweet Chocolate Chips: The base of our crunchy coating. Semi-sweet chocolate provides a balanced flavor, but you can experiment with dark or milk chocolate based on your preference. The chocolate coating is a defining feature of **homemade Eskimo Pie popsicles**.
- 2 tablespoons Coconut Oil (or Vegetable Oil): Adding oil to the chocolate helps create a smooth, glossy coating that’s easier to work with and prevents the chocolate from becoming too hard. The coconut oil adds a nice flavor also.

Why These Ingredients?
Each ingredient plays a vital role. The sweetened condensed milk creates a base that’s already thick and sweet, and the heavy cream adds a luscious texture that is much better than store-bought options. The vanilla extract and pinch of salt enhance the flavors, while the chocolate and oil produce a smooth and glossy coating that is essential for achieving the Eskimo Pie aesthetic. For more on the science of ice cream making, you can check out this great guide from Serious Eats on the science of ice cream .
Tools and Equipment
To successfully craft these homemade Eskimo Pie popsicles, having the right tools is essential. Here’s what you’ll need:
- 9×13 inch Baking Dish: This will serve as the mold for our ice cream base.
- Parchment Paper: This prevents the ice cream from sticking to the dish and makes it easier to remove.
- Mixer (Hand or Stand): To whip the heavy cream to a fluffy consistency.
- Spatula: For folding and smoothing the ice cream mixture and helping to evenly spread the chocolate.
- Sharp Knife or Pizza Cutter: To cut the ice cream into even squares.
- Popsicle Sticks: To insert into the ice cream squares.
- Double Boiler (or Microwave-Safe Bowl): For melting the chocolate.
- Small Bowls or Glasses: For dipping the popsicles into the chocolate.
- Cookie Sheet or Tray lined with parchment paper: For setting up the chocolate coated popsicles.
- Ice Cream Scoop (Optional): Helps with a faster removal of the ice cream block from the dish.
Using the right equipment not only makes the process easier but also ensures better results. For example, a good mixer will whip your heavy cream quickly and evenly, while parchment paper is essential for easy removal of the ice cream block.
Also, take a look on this article about essential kitchen tools from Taste of Home for other essential tools if needed. Having these tools readily available will streamline the process of making your **homemade Eskimo Pie popsicles**.
Step-by-Step Guide to Homemade Eskimo Pie Popsicles
Now, let’s get to the fun part: making our homemade Eskimo Pie popsicles! Follow these detailed steps for a perfect batch every time. We’ll break down each stage to ensure your success.
Step 1: Prepare the Ice Cream Base
- Line the Baking Dish: Begin by lining the 9×13 inch baking dish with parchment paper. Ensure that the paper overlaps the sides to make it easier to lift out the ice cream later.
- Whip the Heavy Cream: In a large mixing bowl, using the mixer, whip the heavy cream until stiff peaks form. This usually takes about 3-5 minutes. Be careful not to overwhip, or it will turn into butter.
- Combine Ingredients: Gently fold in the sweetened condensed milk, vanilla extract, and the pinch of salt into the whipped cream. Mix until well combined, but be gentle to avoid deflating the cream.
- Pour into the Dish: Pour the mixture into the prepared baking dish and spread it evenly with the spatula.
- Freeze: Cover the dish with plastic wrap and freeze for at least 4-6 hours, or preferably overnight, until the ice cream is completely solid.
Step 2: Cut and Prepare the Popsicles
- Remove from Freezer: Once the ice cream is frozen solid, remove the dish from the freezer.
- Lift the Ice Cream Block: Lift the ice cream block out of the dish using the parchment paper overhang.
- Cut into Squares: Using a sharp knife or pizza cutter, cut the ice cream block into even squares. Aim for about 2-3 inch squares depending on your preference for the final popsicle size.
- Insert Popsicle Sticks: Gently insert a popsicle stick into the center of each ice cream square. If the ice cream is too hard, you might need to slightly thaw it for a few minutes so the sticks go in easily.
- Re-freeze: Place the ice cream squares on the parchment-lined tray and refreeze for at least 30 minutes to ensure they are very firm for dipping. This step is crucial for ensuring the **homemade Eskimo Pie popsicles** hold their shape during the chocolate dipping process.
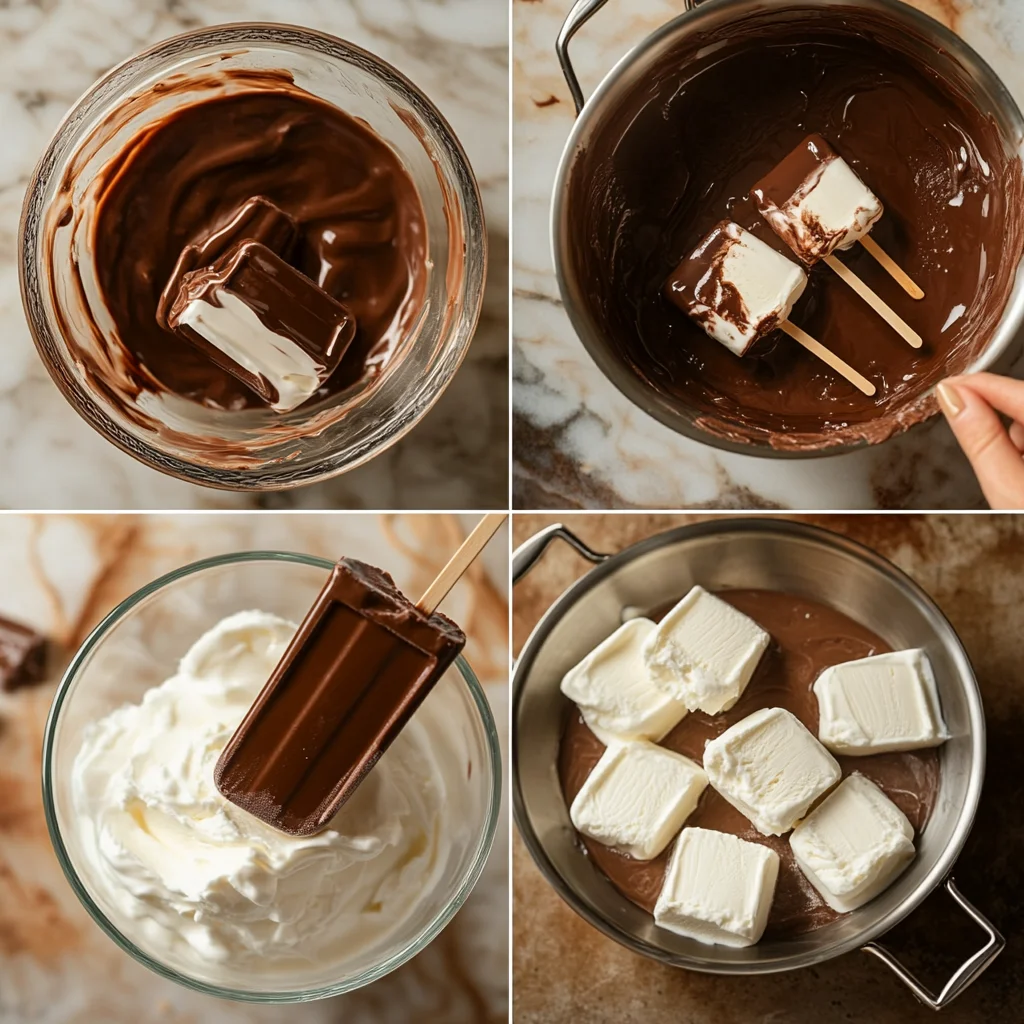
Step 3: Prepare the Chocolate Coating
- Melt the Chocolate: In a double boiler or a microwave-safe bowl, melt the semi-sweet chocolate chips and coconut oil together. If using a microwave, heat in 30-second intervals, stirring in between to avoid burning.
- Stir until Smooth: Stir until the chocolate is completely melted and smooth.
- Let it Cool Slightly: Let the melted chocolate cool slightly for a few minutes so it’s not too hot and easier to work with (it should still be liquid and easy to coat).
Step 4: Dip and Set the Popsicles
- Prepare the Dipping Station: Set up a dipping station with your bowl of melted chocolate and your tray lined with parchment paper close by.
- Dip the Popsicles: Holding each popsicle by its stick, quickly dip it into the melted chocolate, ensuring that the ice cream is completely coated. You can use a spoon to help pour the chocolate over the entire surface. Let any excess drip off.
- Place on Tray: Place the dipped popsicle on the parchment-lined tray.
- Repeat: Repeat the dipping process with the remaining ice cream squares.
- Freeze to Set: Place the tray with the dipped popsicles back into the freezer for 10-15 minutes, or until the chocolate is completely set. This final freeze ensures your **homemade Eskimo Pie popsicles** are ready to enjoy.
Variations for Your Homemade Eskimo Pie Popsicles
Want to put your own twist on these homemade Eskimo Pie popsicles? Here are some variations to consider:
- Different Chocolate: Use dark chocolate or milk chocolate instead of semi-sweet. You can also use white chocolate and add some food coloring.
- Flavor Infusion: Add a few drops of peppermint extract or coffee extract to the ice cream base for a different flavor profile.
- Nutty Crunch: Add chopped nuts (like almonds, peanuts, or pecans) to the chocolate coating for a nutty crunch. Sprinkle the nuts on the chocolate after you dip the popsicle and before the chocolate sets.
- Cookie Crumbs: Roll the dipped popsicles in crushed graham crackers or Oreo crumbs for added texture and flavor.
- Caramel Swirl: Drizzle caramel sauce over the ice cream base before freezing.
- Fruity Fun: Add pureed fruit, like strawberries or raspberries, to the ice cream base for a refreshing twist. This is a great way to customize your **homemade Eskimo Pie Popsicles**.
Serving Suggestions and Presentation
These homemade Eskimo Pie popsicles are delightful on their own, but here are some serving suggestions:
- Individual Servings: Serve each popsicle on a small plate or in a paper cup.
- Dessert Platter: Arrange them on a platter with other desserts for a special occasion. Consider pairing them with a warm dish, like these Scalloped Potatoes with Cheese Powder, for a delightful contrast of temperatures and flavors.
- Garnishes: Decorate with a sprinkle of sea salt, some chocolate shavings or sprinkles, or a drizzle of melted chocolate.
- Dipping Sauces: Provide small bowls of melted chocolate, caramel, or fruit purees for extra dipping fun.
Storage Tips
To maintain the quality of your homemade Eskimo Pie popsicles, proper storage is key:
- Individual Wrapping: Wrap each popsicle in plastic wrap or parchment paper to prevent freezer burn and to stop them sticking together.
- Airtight Container: Store the wrapped popsicles in an airtight container or freezer bag.
- Freezer Life: Properly stored, these popsicles can last for up to 2-3 months in the freezer.
Frequently Asked Questions (FAQs)
Can I use milk instead of heavy cream?
While you can use milk, the texture won’t be as rich or creamy. Heavy cream is recommended for the best results. The higher fat content is what gives **homemade Eskimo Pie popsicles** their signature texture.
Can I use a different sweetener than condensed milk?
Sweetened condensed milk is crucial for the recipe’s texture and sweetness. Substituting it will significantly alter the outcome. You can try to make your own condensed milk alternative, there are some recipes on Internet.
Can I skip the coconut oil in the chocolate coating?
The oil is essential for creating a smooth, dippable chocolate coating. Skipping it may result in a thick, difficult-to-work-with coating.
How do I prevent the chocolate from cracking?
Make sure the chocolate is not too hot and the ice cream is very cold. Also, add a little bit of oil to the melted chocolate and this help preventing cracks.
How long can I store these in the freezer?
Properly stored in an airtight container, they can last for up to 2-3 months in the freezer without any problems.
Conclusion
There you have it! Homemade Eskimo Pie popsicles that are not only easy to make but are also way more delicious than their store-bought counterparts. The combination of creamy ice cream and a crisp chocolate coating makes these a perfect treat for any time of the year. So grab your ingredients, gather your equipment, and let’s make some delicious memories! Don’t hesitate to experiment with different flavors and coatings to make them your own.
These **homemade Eskimo Pie popsicles** are a guaranteed crowd-pleaser! For another delicious dessert idea, why not try our Pesto Langostino Zucchini and Pasta – it’s a completely different flavor profile, but equally satisfying. Or, if you’re in the mood for something savory, our Flavorful Lebanese Lamb, Lentils, Rice & Spinach Recipe is a hearty and delicious option. And for a unique and zesty sauce to accompany various dishes, check out our Red Pepper Sauce, Arugula & Pistachio Pesto Recipe.
Ready to taste the difference? Make your own version and let us know if it’s a 10/10 taste! 😀
Other Recipe Ideas to Explore:
- Homemade Ice Cream Sandwiches
- Classic Vanilla Ice Cream Recipe
- Chocolate Covered Strawberries
- Homemade Fudge Pops
- Frozen Yogurt Bark
- Perhaps a savory dish like our Churu Chicken Amarillo: A Creamy, Cheesy Delight would be perfect!
- And if you love chicken, you might love those Apple and Honey-Glazed Chicken Tenders.
Each ingredient plays a vital role. The sweetened condensed milk creates a base that’s already thick and sweet, and the heavy cream adds a luscious texture that is much better than store-bought options. The vanilla extract and pinch of salt enhance the flavors, while the chocolate and oil produce a smooth and glossy coating that is essential for achieving the Eskimo Pie aesthetic. For more on the science of ice cream making, you can check out this great guide from Serious Eats on the science of ice cream .
Using the right equipment not only makes the process easier but also ensures better results. For example, a good mixer will whip your heavy cream quickly and evenly, while parchment paper is essential for easy removal of the ice cream block. Also, take a look on this article about essential kitchen tools from Taste of Home for other essential tools if needed. Having these tools readily available will streamline the process of making your **homemade Eskimo Pie popsicles**.