
Are you on a quest to revolutionize your sandwich creations? Baking your own Sourdough Hoagie Rolls is more than just an exercise in baking; it’s about crafting an edible masterpiece that delivers a symphony of flavors and textures that simply cannot be matched by commercially produced alternatives.
This comprehensive guide will meticulously walk you through each and every step of the process, ensuring that you can confidently bake the perfect sourdough hoagie roll time and time again.
Table of Contents
- The Unmatched Appeal of Sourdough Hoagie Rolls
- Deconstructing the Essential Ingredients for Sourdough Hoagie Rolls
- Assembling Your Arsenal: Tools and Equipment for Success
- A Step-by-Step Masterclass: Baking Sourdough Hoagie Rolls to Perfection
- Troubleshooting and Tips for Sourdough Hoagie Roll Success
- Sourdough Hoagie Roll Variations
- Conclusion: Enjoy Your Homemade Sourdough Hoagie Rolls
The Unmatched Appeal of Sourdough Hoagie Rolls
There’s an undeniable allure to biting into a sourdough hoagie roll that boasts a crisp, golden-brown crust that gives way to a soft, chewy interior. The sourdough element, celebrated for its subtle yet distinctive tangy profile, introduces an extra layer of complexity and depth. The delightful tang of a sourdough hoagie roll perfectly complements a wide variety of fillings. Whether you’re envisioning a classic Italian sub brimming with savory delights, a satisfying and hearty Philly cheesesteak, or a simple yet elegant turkey and cheese sandwich, the quality of the roll serves as the foundation upon which your culinary masterpiece is built.
Moreover, the act of crafting these rolls yourself grants you complete control over the ingredients, ensuring that you can create a healthier, additive-free option for both yourself and your cherished family members. If you’re on the fence, this guide to Sourdough Bread vs. Regular Bread: Is One Healthier? from WebMD may convince you that you should prefer the first option.
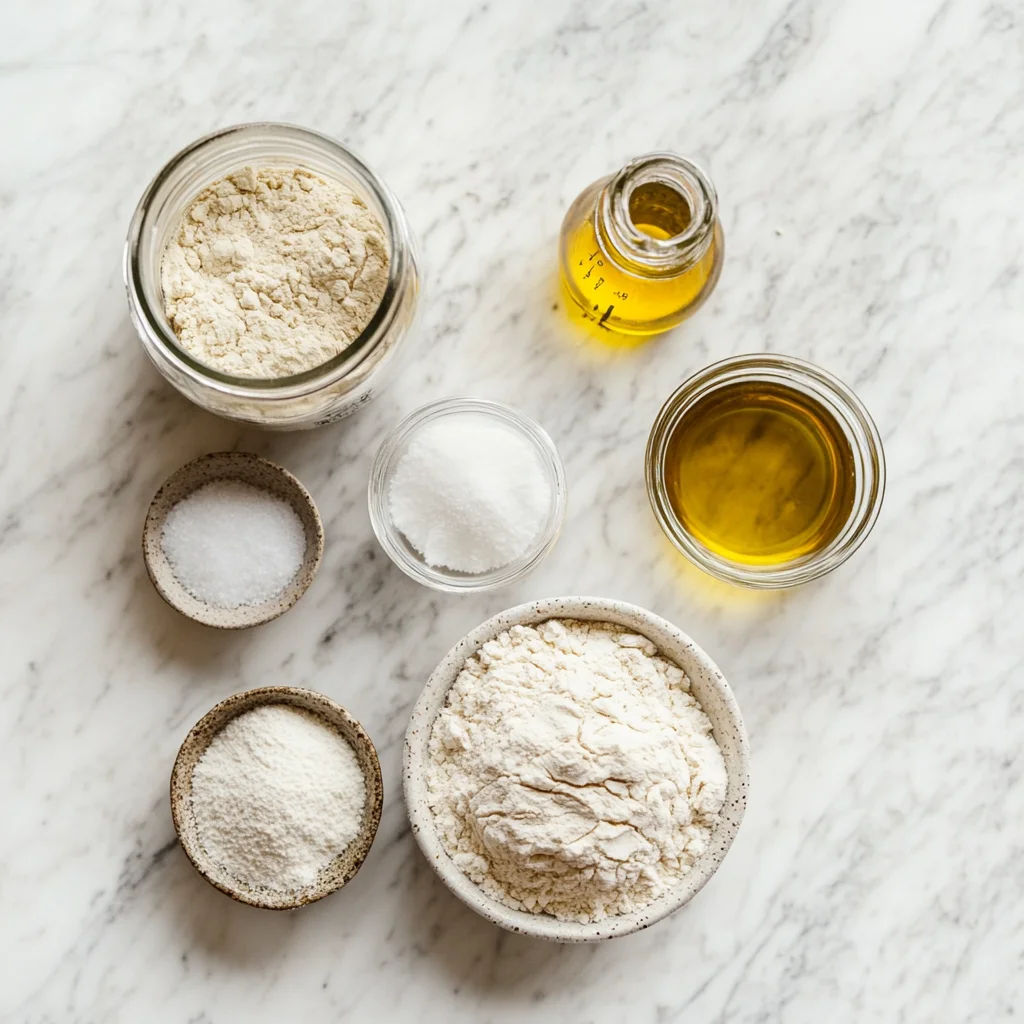
Deconstructing the Essential Ingredients for Sourdough Hoagie Rolls
To embark on your journey towards creating the perfect sourdough hoagie rolls, you’ll require the following carefully selected ingredients:
- Sourdough Starter: This is the very heart and soul of your sourdough creation. A robust, active starter is absolutely indispensable for achieving optimal rise and that signature tangy flavor that defines sourdough.
- Tip: To ensure that your starter is performing at its absolute peak, commit to feeding it regularly for several days leading up to your baking session. Monitor it closely for consistent bubbling and a reliable doubling in size after each feeding. This is the true sign of a healthy, active starter.
- Bread Flour: This ingredient provides the structural integrity and promotes the gluten development that is necessary for achieving that coveted chewiness in your rolls.
- Tip: Seek out bread flour that boasts a protein content that falls within the range of 12% to 14%. This higher protein content is the key to unlocking the signature texture that sourdough is celebrated for.
- Water: Water serves to hydrate the flour and initiate the crucial gluten activation process that is so vital to the structure of the dough.
- Tip: For the most pristine flavor, opt for filtered water. Be mindful of water that is heavily chlorinated, as this can potentially inhibit the activity of your precious starter.
- Salt: Salt not only enhances the overall flavor profile but also assumes a critical role in regulating the fermentation process.
- Tip: Never, ever omit the salt! It is absolutely essential for both the taste and the texture of your rolls. Salt acts as a balancing agent, taming the sweetness and carefully controlling the yeast activity, ultimately leading to a more controlled rise and a more flavorful crumb.
- Olive Oil (Optional): The inclusion of olive oil lends a subtle richness and contributes to a softer, more tender crust that is simply irresistible.
- Tip: Opt for a high-quality extra virgin olive oil to unlock the most pronounced flavor enhancement. A fruity, robust olive oil can impart a delightful nuance to the final product, elevating it to new heights.
Assembling Your Arsenal: Tools and Equipment for Success
Equipping yourself with the appropriate tools will not only streamline the baking process but also elevate your overall baking experience to a new level:
- Digital Kitchen Scale: Precise measurements are absolutely paramount in the realm of baking, especially when you’re working with the delicate balance of sourdough. Maintaining consistency in ingredient ratios is the key to achieving predictable and repeatable results.
- Mixing Bowls: You’ll need a generously sized bowl for the initial mixing of your dough, as well as another bowl in which to allow it to undergo its crucial rising phase.
- Dough Scraper: This invaluable tool aids in handling the often-sticky dough with both grace and ease. It also ensures even division when you’re portioning out the rolls, guaranteeing uniformity.
- Baking Sheet: This is your stage upon which your rolls will transform into golden masterpieces, baked to perfection.
- Parchment Paper: Parchment paper acts as a protective barrier, preventing the rolls from adhering to the baking sheet. This ensures easy removal and eliminates the frustration of unwanted sticking.
- Spray Bottle: This unassuming tool is responsible for introducing steam into the oven, a critical step in achieving that coveted crispy crust that defines a truly exceptional roll.
- Oven: Your oven is the very heart of your baking endeavor! Ensure that it is accurately calibrated to maintain consistent temperatures, guaranteeing optimal results. Investing in an oven thermometer is a wise decision.
A Step-by-Step Masterclass: Baking Sourdough Hoagie Rolls to Perfection
Step 1: Laying the Foundation: Preparing the Dough
- Combine the Ingredients: In a generously sized mixing bowl, introduce 200g of your vibrant, active sourdough starter, 300g of lukewarm water, 500g of premium bread flour, 2 tablespoons of olive oil and 10g of salt.
- Tip: Exercise caution to ensure that the water is not excessively hot, as this could potentially harm your delicate starter. Aim for a water temperature of around 80-90°F (27-32°C).
- The Initial Mix: Gently combine the ingredients until they are just barely incorporated. At this stage, the resulting dough will appear somewhat shaggy.
- Autolyse (Optional): Allow the dough to rest, undisturbed, for a period of 30-60 minutes. This process, known as autolysing, allows the flour to fully hydrate, paving the way for a superior texture in the final product. During this time, gluten development begins, resulting in a smoother, more elastic dough.
Step 2: Mastering the Art of Kneading
- Kneading by Hand: Turn the dough out onto a lightly floured work surface and knead diligently for approximately 8-10 minutes, until it transforms into a smooth and elastic mass. The dough should be supple and responsive to your touch.
- Tip: If the dough exhibits excessive stickiness, gradually incorporate additional flour, one tablespoon at a time, until the desired consistency is achieved. Avoid adding too much flour, as this can result in a dry, dense roll.
- First Rise (Bulk Fermentation): Transfer the kneaded dough into a lightly oiled bowl, ensuring that all surfaces are coated. Cover the bowl securely with plastic wrap or a damp cloth and allow the dough to rise for a duration of 4-6 hours at room temperature, or until it has visibly doubled in size. To encourage strength development and enhance the dough’s structure, perform gentle stretch and folds every hour during the initial 2-3 hours of the rising period. This involves gently stretching a portion of the dough upwards and folding it over the center, repeating this process several times around the circumference of the dough.
- Tip: The duration of the rising phase will fluctuate depending on the ambient temperature of your kitchen. Warmer environments will accelerate the process, while cooler conditions will slow it down. Be patient and trust your instincts; the dough is ready when it has doubled in size and appears light and airy.
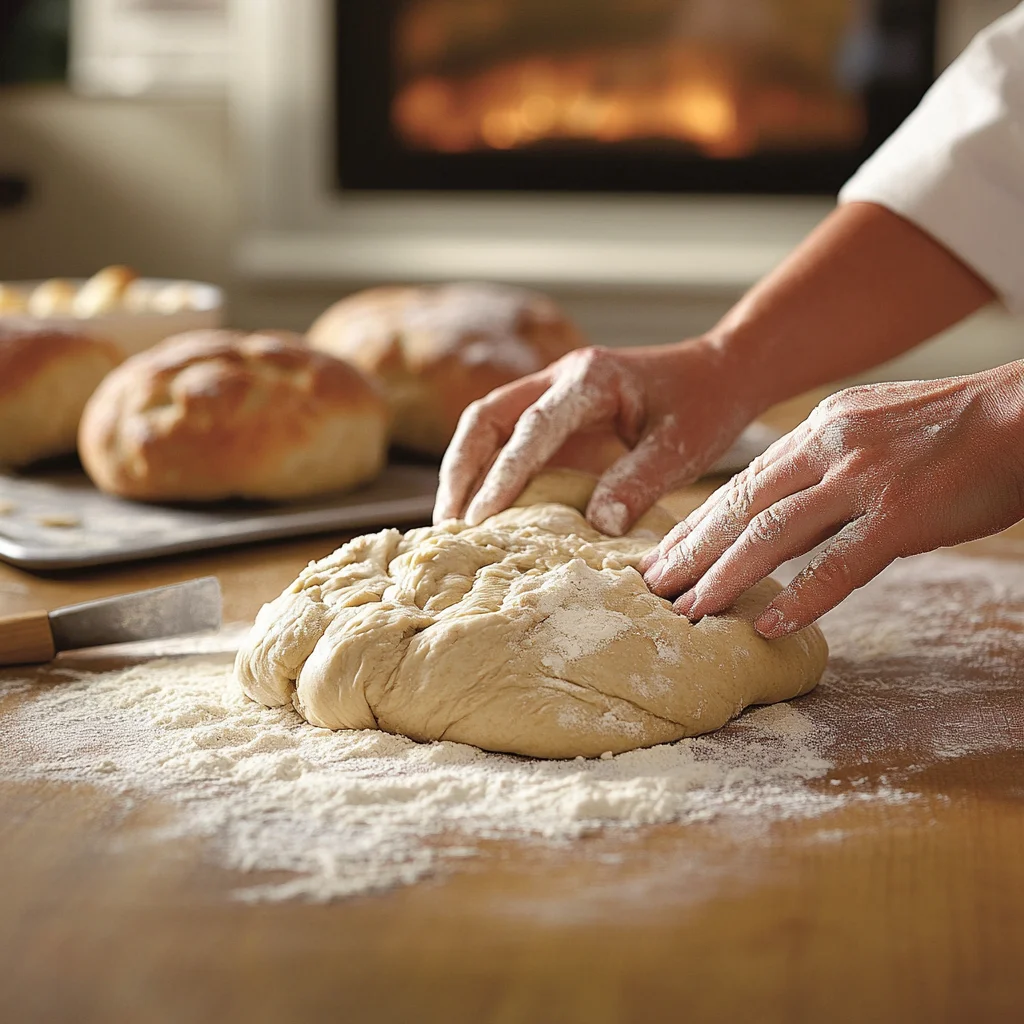
Step 3: Shaping the Rolls with Precision and Care
- Divide and Conquer: Gently release the dough from the bowl onto a lightly floured surface. Employ your trusty dough scraper to divide it into 6-8 equal portions, ensuring consistency in size and shape.
- The Shaping Process: Shape each portion into a classic hoagie roll, using gentle and deliberate movements. Gently elongate and roll the dough to create an oblong form, aiming for a length of approximately 6-8 inches. For best results, consider watching a video tutorial on shaping sourdough hoagie rolls. A visual guide can be immensely helpful. You can find many helpful videos on YouTube, such as this one.
- Tip: Exercise gentleness throughout this shaping process to avoid expelling too much precious air from the dough. The goal is to maintain the dough’s delicate structure and preserve its airy texture.
- Second Rise (Proofing): Position the meticulously shaped rolls on a baking sheet that has been lined with parchment paper. Cover them loosely with plastic wrap or a clean, damp kitchen towel to prevent them from drying out. Allow them to rise for a further 1-2 hours, or until they appear visibly puffy and light. This final proofing stage allows the dough to relax and expand, resulting in a lighter, more tender roll.
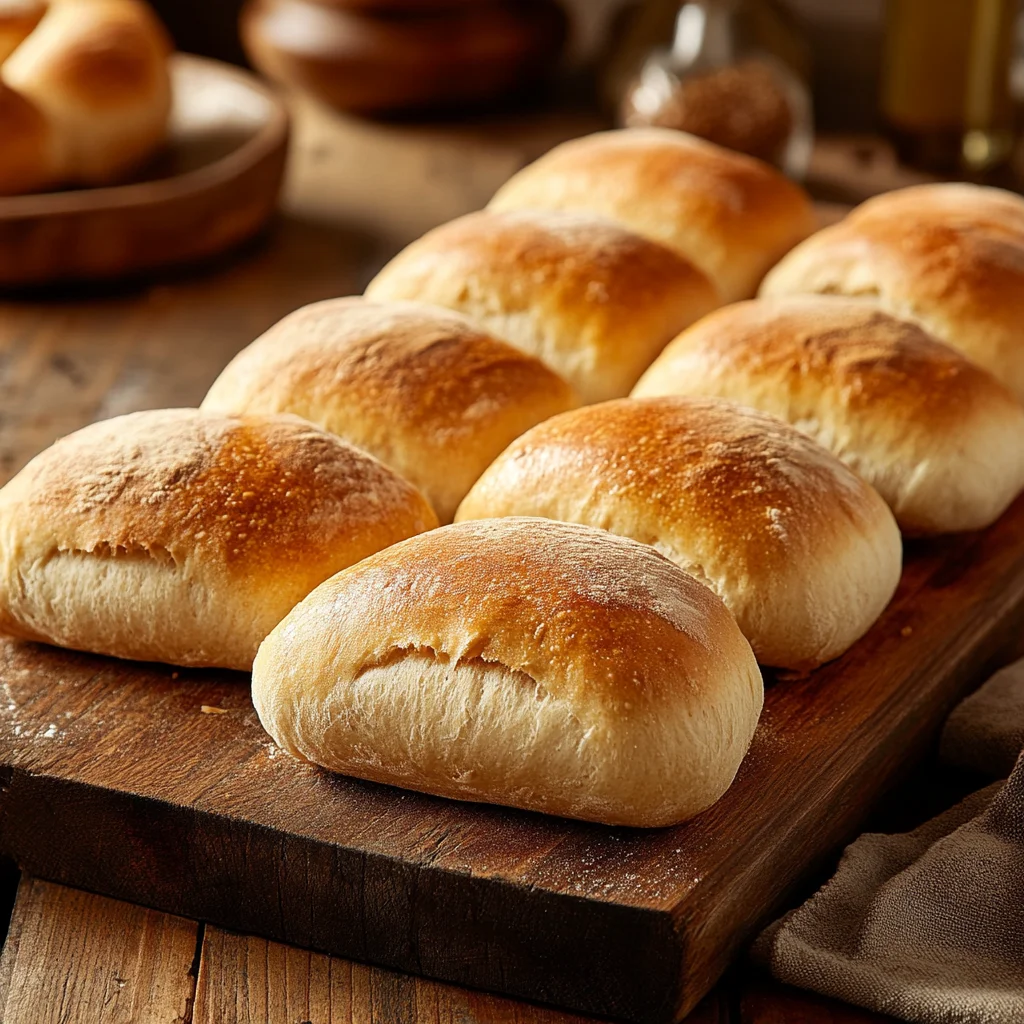
Step 4: Baking to Golden Perfection
- Preheat the Oven: Preheat your oven to a precise temperature of 450°F (232°C), ensuring that a baking stone or sheet is positioned inside to provide even heat distribution.
- Tip: The inclusion of a baking stone or baking steel contributes to a markedly crispier crust, as it helps to maintain a consistent temperature and draw moisture away from the bottom of the rolls.
- Scoring the Rolls: Immediately before baking, wield a sharp knife or lame to create a shallow slash along the length of each roll. This crucial step allows the rolls to expand evenly during baking and prevents them from bursting or cracking.
- Tip: Experiment with different scoring patterns to create visually appealing designs on your rolls.
- Creating Steam: As you place the baking sheet into the preheated oven, introduce steam by either placing a pan containing hot water on the bottom rack or employing a spray bottle to spritz water directly into the oven. This infusion of steam creates a humid environment that promotes the development of a delectable, crispy crust.
- The Baking Phase: Bake the rolls for a duration of 20-25 minutes, or until they exhibit a beautiful golden-brown hue and emit a hollow sound when gently tapped on the bottom.
- Tip: Rotate the baking sheet halfway through the baking process to ensure uniform browning and even cooking.
- Cooling Down: Once baked to golden perfection, transfer the sourdough hoagie rolls to a wire rack to allow them to cool completely before slicing and serving. This cooling period is essential for allowing the crumb to set properly.
Troubleshooting and Tips for Sourdough Hoagie Roll Success
- Weak Starter: If your rolls aren’t rising properly, your starter may not be active enough. Ensure it’s fed regularly and doubles in size within a few hours after feeding.
- Over-proofing: Over-proofed dough will collapse in the oven. Learn to recognize the signs of a perfectly proofed dough – it should be puffy and spring back slowly when poked.
- Dense Crumb: A dense crumb can be caused by under-proofing, not enough water in the dough, or over-mixing.
- Sticky Dough: If your dough is excessively sticky, do not panic. Lightly flour your hands and work surface, and use a dough scraper to help you manipulate the dough without adding too much extra flour.
Sourdough Hoagie Roll Variations
Once you’ve mastered the basic sourdough hoagie roll, try these variations:
- Seeded Rolls: Before baking, brush the rolls with water and sprinkle with sesame seeds, poppy seeds, or everything bagel seasoning.
- Herb Rolls: Incorporate chopped fresh herbs like rosemary, thyme, or oregano into the dough during the kneading process.
- Garlic Rolls: Add roasted garlic cloves to the dough for a savory and aromatic twist.
- Cheese Rolls: Mix shredded cheese, like cheddar of Parmesan, into the dough. Or consider a cheesy side, with this recipe for Scalloped Potatoes with Cheese Powder.
Conclusion: Enjoy Your Homemade Sourdough Hoagie Rolls
With a little practice, you’ll be baking incredible sourdough hoagie rolls that will elevate your sandwiches to a whole new level. The satisfaction of creating these flavorful and textural masterpieces from scratch is truly rewarding. For more delicious recipes, check out some of other great meals, like, Pesto Langostino, Zucchini, and Pasta: Delicious Recipe, Flavorful Lebanese Lamb, Lentils, Rice & Spinach Recipe, or Apple and Honey-Glazed Chicken Tenders Recipe. Happy baking!
Test it and let us know if it’s a 10/10 taste 😀